How I built a Markdown Previewer with React

Self-taught front-end developer. I've been teaching myself web development through a combination of freeCodeCamp, Scrimba, Codecademy and the general internet.
Welcome to my first ever dev blog post! Here, I'll be talking about how I built a Markdown Previewer with ReactJS as part of the freeCodeCamp curriculum.
I'm starting a dev blog to help cement my understanding of coding concepts and to analyse and evaluate the decisions I made while coding my apps. If any of my articles can help other aspiring developers on their coding journey, then that's even better!
I recently revisited my Markdown Previewer to restyle it and make a few tweaks, so I reckon this is a good place to start with my writing. You can check out the code for this app on Github.
Why build it?
I coded the app for the Build a Markdown Previewer freeCodeCamp project, which is part of the Front End Development Libraries certification.
This module teaches you the basics of several popular web libraries, including React, Redux, jQuery, Bootstrap and Sass. It then challenges you to build five different projects, the idea being that you use one or more of the above technologies.
What does the app do?
My app takes a plain text input and converts it to formatted HTML based on any Github-flavoured Markdown syntax the user includes. It does this in real-time and displays the result in a live preview box.
The freeCodeCamp brief also specifies that when the app first loads, the <textarea> input should contain valid Markdown examples for a variety of different elements, such as a header, subheader, link, code block, image, etc. Hence, the mass of placeholder text I've included!
I definitely now know a lot more about formatting markdown, which is handy for writing Github readmes and dev blog articles like this!
Why React?
My first impressions of React were very positive, and I was enjoying the JSX syntax and the gentle learning curve. React's speed and efficiency also seemed like a good fit for a Markdown Previewer, particularly as the freeCodeCamp brief stipulated that the preview must update as the user types. So, I decided to take the plunge and build my first ever React-based app.
For the unfamiliar, React is an open-source JavaScript library developed and maintained by the folks at Facebook. It's a great technology for building fast, dynamic UIs and single-page web applications. React is also very popular and in-demand at the moment, or so I keep being told!
The secret to React's speed and efficiency in comparison to vanilla JS is its virtual DOM. In a nutshell, React maintains a virtual representation of the DOM in memory, which it updates when the state of a component changes. React then compares the virtual DOM to the real DOM, looking for differences between the two and only updating objects that have changed.
This system cleverly reduces unnecessary manipulation of the real DOM. Remember that every DOM update comes with a performance cost!
Here's a nice video that explains React's virtual DOM in simple terms:
Another benefit of React is it allows you to easily create reusable web components through its JSX syntax. JSX essentially lets you write HTML inside JavaScript without having to call on cumbersome DOM methods and properties such as createElement(), .textContent, innerHTML, appendChild(), etc.
Here's an example of some JSX in action:
function Header() {
  return (
    <header>
      <h1 className="text-center" tabIndex="0">
        Markup my Markdown!
      </h1>
    </header>
  )
}
Setting up
I orginally built my Markdown Previewer using a single JS file and CDN script tags to import the React library. I figured this would make it easier to copy my app over from my dev environment (basically just Atom and Git) to CodePen for submitting to freeCodeCamp.
However, I wanted to have a go at using the Create-React-App to set a local Webpack-based dev server, which it turns out is very easy as long as you have a basic grasp of using CLI and have Node.js and npm installed on your system.
This dev server also makes it simple to modularize React components into separate JS files, which helps improve readability and I believe is a good habit to get into.
My favourite part of Create-React-App is the live-reload, so no more manual browser refreshing when you save your changes! Of course, with the right plugins, you can also do something similar in code editors such as Atom and VSCode.
Visual design & CSS
I opted for a simple, minimalist design that devotes most of the screen space to the text input and preview boxes, which I believe is a very common-sense approach.
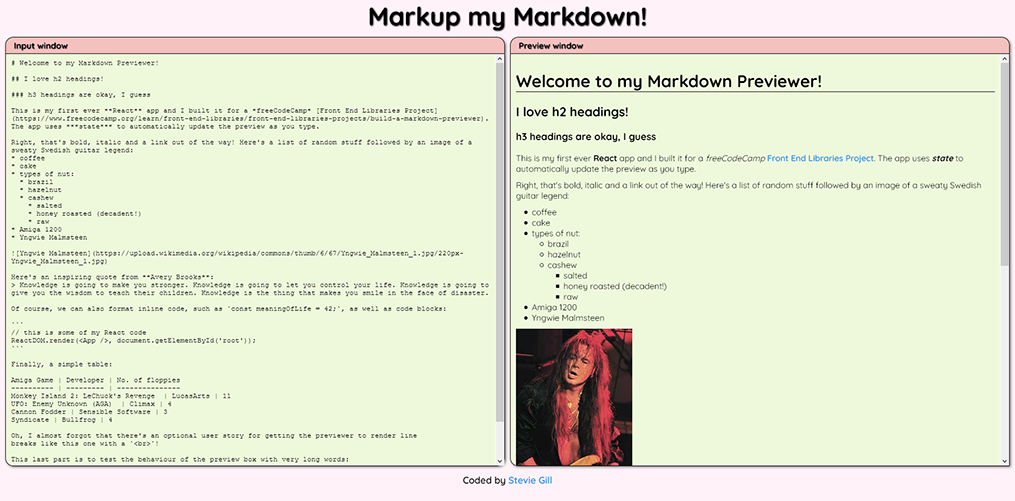
I achieved the layout using CSS flexbox at multiple levels. At larger screen sizes, the input and preview boxes sit side-by-side in a two-column layout that flips to a single column layout for mobile devices (see below).
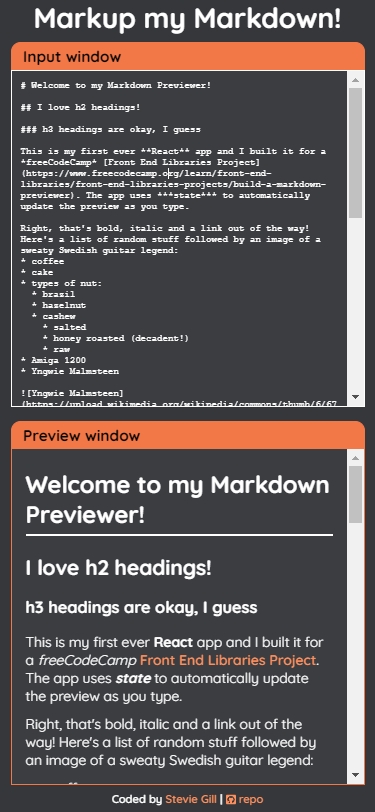
For both mobile and desktop layouts, the page doesn't scroll and all the elements are forced to fit within the viewport. Obviously, the content of the input and preview elements does scroll when necessary.
To get this all working properly, I did need to set max-width and flex-basis to 50% for the flex containers that the input and preview boxes live in. I also needed to override some of the default overflow values for the containers.
Originally, I went with black text and pastel-shades of pink and green for the backgrounds. It seemed like a good idea at the time but feedback on this colour scheme wasn't exactly enthusiastic and in retrospect, it was a tad gaudy! Also, some of the text contrast ratios didn't quite meet WCAG standards.
So, I recently switched to a dark grey background with white text and orange highlights. This scheme provides better text contrast and, to my eye, it looks quite elegant.
By the way, you can easily check contrast by clicking on any text colour in your browser dev tools. There's also a handy WCAG Contrast Checker plugin for both Firefox and Chrome.
Parsing the Markdown text
The freeCodeCamp challenge permitted the use of an external library for parsing the markdown syntax, so coding the app was fairly straightforward.
For this purpose, I am using the Marked library, which is very easy to install, configure and use. You simply pass in your markdown text into the function as a string and it returns another string containing marked-up HTML, eg:
const htmlMarkup = marked(rawText)
I perform all my business logic inside of the <Input /> component, which passes down both its state and functions as props to the <Editor /> and <Preview /> components:
function Input() {
  const [rawText, setState] = useState(defaultText)

  const getMarkdown = () => {
    // parse markdown text using Marked library
    const htmlMarkup = marked(rawText)

    // clean up HTML to mitigate XSS risk
    const cleanMarkup = DOMPurify.sanitize(htmlMarkup)

    // prepare html for use with dangerouslySetInnerHTML attribute
    return { __html: cleanMarkup }
  }

  const handleChange = event => {
    setState(event.target.value)
  }

  return (
    <div className="windows-container">
      <Editor handleChange={handleChange} rawText={rawText} />
      <Preview getMarkdown={getMarkdown()} />
    </div>
  )
}
<Editor /> renders a <textarea>, which is a controlled component. It gets its value from the passed-down state. Every time the user updates the input text, it calls an event handler that updates state with the new text value.
function Editor(props) {
  return (
    <div className="flexitem">
      <div className="bar" tabIndex="0">
        <p>Input window</p>
      </div>
      <textarea
        id="editor"
        className="editor"
        value={props.rawText}
        spellCheck="false"
        onChange={props.handleChange}
      />
    </div>
  )
}
And each time state updates, it triggers a rerender and <Preview /> calls the getMarkdown() function.
getMarkdown() does the job of converting the markdown text into an HTML string. <Preview /> receives this string as a prop, which I then pass to the dangerouslySetInnerHTML attribute for rendering.
function Preview(props) {
  return (
    <div className="flexitem">
      <div className="bar">
        <p tabIndex="0">Preview window</p>
      </div>
      <div
        id="preview"
        className="preview"
        dangerouslySetInnerHTML={props.getMarkdown}
        tabIndex="0"
      ></div>
    </div>
  )
}
Using dangerouslySetInnerHTML
dangerouslySetInnerHTML is a React-specific attribute and similar to using the .innerHTML DOM property in vanilla JS. If it sounds scary, that's because it's supposed to!
Like .innerHTML, dangerouslySetInnerHTML sets the HTML content inside the element you target. If the source of this new HTML is from a user input, it can open up your app to malicious code injection (i.e. an XSS attack). This is why it's recommended that you sanitize the code first.
So, that's exactly what I did by using the DOMPurify library. The getMarkdown() function passes the output from the marked library to the DOMPurify library, which generates a sanitized output that I then pass into the dangerouslySetInnerHTML attribute. I should mention that React makes you pass this attribute an object with a __html key to further remind you of the danger!
However, some developers in the freeCodeCamp community assured me that the threat of an XSS attack in the context of my app is virtually non-existent. This is because no data is shared or saved, so if a user inputs malicious code, it will only affect themselves. Anyway, better to be safe than sorry!
Final thoughts
I'm very proud of my Markdown Previewer, partly because it was the first app I built with React but also because I think it looks nice (after a redesign) and performs well. In terms of improvements, one idea I had was adding a button that allows the user to see the HTML version of the preview.
Anyway, I found writing this article to be a useful exercise 😀


